Getting waypoints into the Garmin GPS 60 using .loc file and GPSBabel
(Note, assuming you have access to PocketQueries on geocaching.com, I recommend updating MapSource and opening the .gpx file directly in MapSource. See the main article for details.)
UPDATE 1/7/06: I got a note from the GPSBabel Guy who let's us know about a
way to get waypoints into your GPSr directly from GPSBabel:
You did know that you can simplify your process by eliminating the
bounce through mapsource and choosing type "garmin" and a file of
"usb:"
(or com3: or whatever, if you're using serial...) and shooting them
straight to your unit, right?
Signed,
The GPSBabel Guy.
Here's how I upload waypoints to my GPSr:
Download .loc file from geocaching.com. You can do this from
either the search
results screen (you have to be logged in, and you can download up
to 20
waypoints at a time), or from the Pocket Queries
fuction (you have to be logged in as a premium member, and you can
download up to 500 waypoints at a time.) More on this
later.
Use GPSBabel to convert the
.loc file to a .mps file. (See the section immediately below for more detail on this step.)
Open or import the .mps file into the MapSource software that came
with the GPS 60.
Select the "Send to device" function in MapSource.
Note that this proceedure will add upon the waypoints currently in the
GPSr. It won't blow away what's already in there.
Using GPSBabel to Convert .loc Files to .mps Files
I use the GPSBabel to
convert .loc waypoint files to .mps files. Here's the proceedure I use:
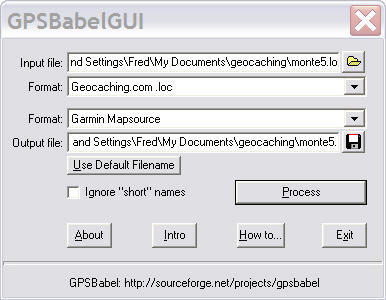
Run GPSBabelGUI.exe (I didn't want to learn the command-line
interface. This interface might only be available for Windows.)
Choose the .loc file I want to convert as the input file. Note the
format is Geocaching.com .loc.
Choose the output file format to be Garmin MapSource .mps.